Who doesn’t enjoy a good birthday? The only thing I struggle with is what to get my friends as presents. I always want to get something meaningful that is not single. Sometimes people drop hints, which is fantastically useful, but other times I am stumped. My solution in this scenario is cake. A good cake shows that you have put effort in, you have thought about what they would like flavour wise and can also be made to look beautiful. A good cake will be remembered.
While I was at university I made many birthday cakes. They are great gifts when you are on a budget, as a basic cake can be made for around £10 and will be far better than most things you can buy for that amount in a shop. Birthdays are fun, but birthdays with a homemade cake are just a little bit better. Everyone will enjoy the food more and the overall atmosphere will be just a little bit happier – of course, if you don’t have time to bake something, a bought cake is not going to ruin the day. My view is that if someone provides me with cake, I am going to eat it!
Of course the most important part of a birthday is not the cake, it’s the people. If you are busy with university or work, it can often be hard to find time to meet up with friends but birthdays are a perfect time to come together and celebrate throughout the year. It can be a nice break from the stress of day to day life and regular catch-ups with friends are always good fun.
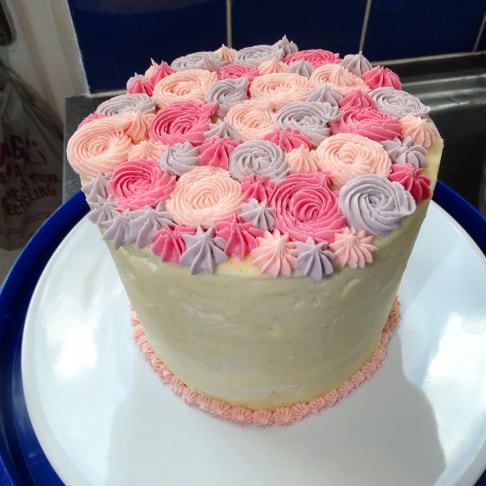
This week’s cake recipe can obviously be made without the added unicorn features to create a standard ombre cake or, vice versa, you can use the unicorn instructions to turn a normal sponge cake into a beautiful masterpiece. I made this for one of my best friends. She loves rose gold and pink so I went with an internal pink ombre and decorated with a gold horn and pink and purple swirls. You can obviously customise the colour to whatever you fancy – you could even do a rainbow inside!

I hope you enjoy making this cake as much as I did. It was definitely a labour of love (I mean come on, I lined eight tins for this – if that doesn’t show that I was willing to do whatever it took to make this cake amazing, I don’t know what will). Either way, I think a multi-layered, colourful cake is something that everyone should try at some point, even if it is only to say that you have done one, and if you are putting all that effort in then you can easily elevate it to unicorn status with very little extra effort.
Ombre Unicorn Cake
10 oz. unsalted butter
10 oz. sugar
10 oz. self-raising flour or plain flour mixed with 2 ½ tsp baking powder
5 eggs
60ml milk
1 tbsp vanilla extract
For the syrup (optional but prevents the cake from being to dry):
3 tbsp sugar
3 tbsp water
25ml liqueur (optional) – I like to use raspberry
For the Icing:
400g salted butter at room temperature – I find that salted butter gives a much better tasting buttercream as it prevents the icing from being too sickly sweet.
600-650g sifted icing sugar
1 tbsp vanilla extract
Gel food colouring
Extras:
A small block of fondant icing
Black food dye
Paint brush
Gold lustre dust
A small amount of rosewater or vodka
One wooden dowel (for the centre of the horn)
Two cocktail sticks.
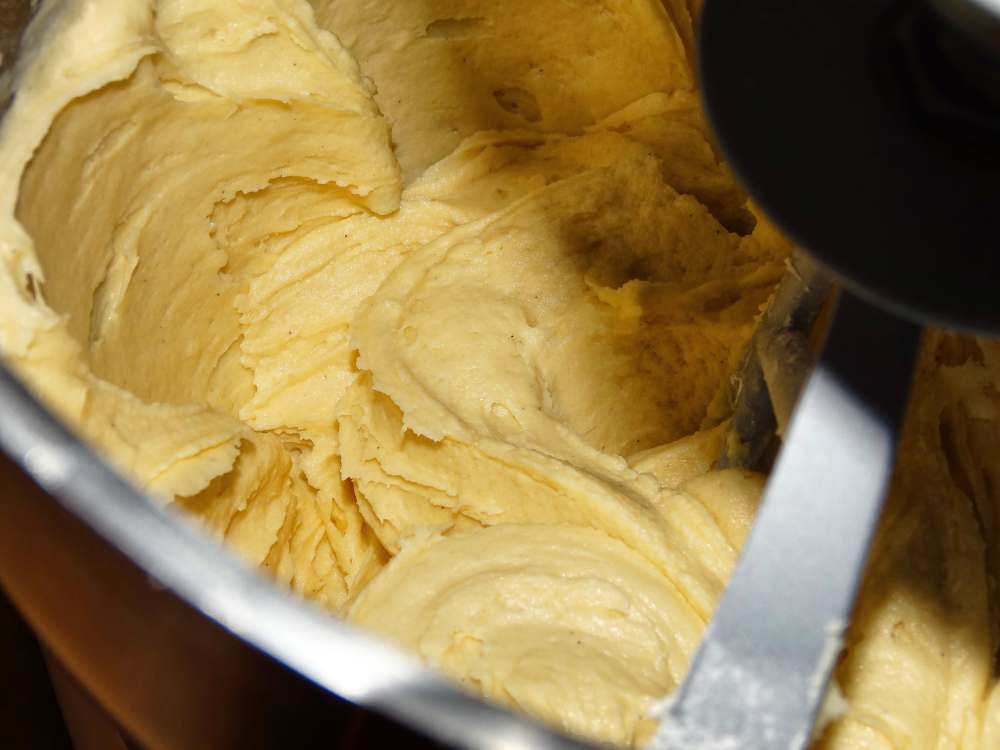
Cream the butter with the sugar and beat until light and fluffy.
Add the vanilla extract and beat again.
Mix in the eggs one at a time followed by a tablespoon of flour.
Once the eggs have been mixed into the rest of the batter, tip in the remaining flour and beat until completely combined.
Finally, add the milk and beat one last time.
Preheat the oven to gas mark 3 (160°C)
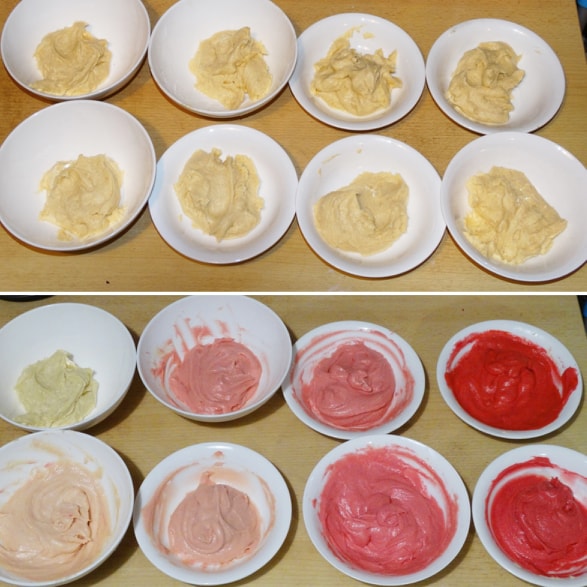
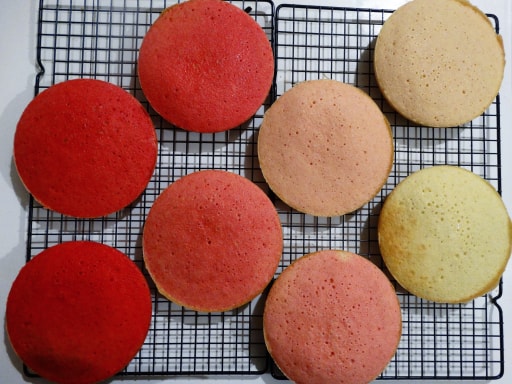
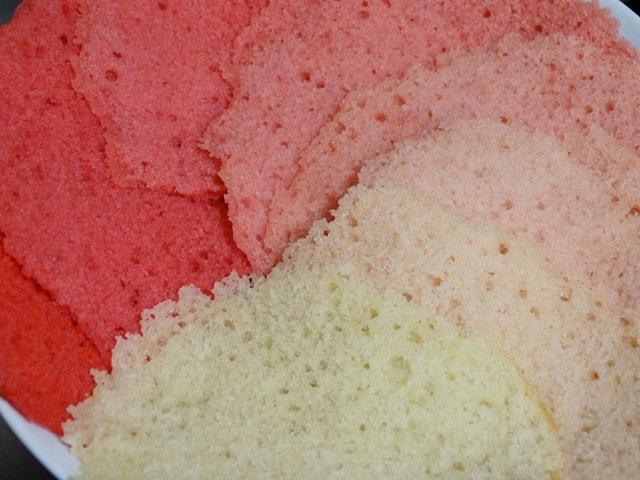
Split the cake mix into eight parts and add a small amount of food dye to each one increasing the quantity of dye each time.
Butter and line as many 6 inch baking tins as you have and bake for 18-20 minutes.
While the cakes are baking, place the sugar and water for the syrup into a pan.
Heat and stir until all the sugar has dissolved.
Remove from the heat and stir the liqueur.
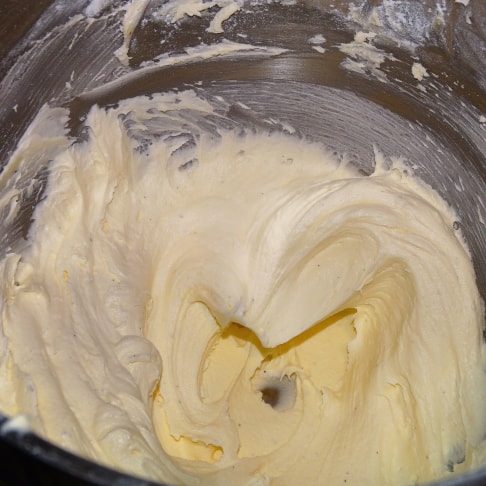
To prepare the icing, place the butter into the bowl of a stand mixer fitted with the whisk attachment. Using the whisk instead of the K-beater allows for a much lighter, softer buttercream.
Whisk the butter until it is soft and the colour begins to pale.
Turn the mixer down to its minimum speed and add half of the icing sugar. The slow speed prevents you from covering the entire kitchen in a cloud of sticky sugar.
Once the first batch of icing sugar has been beaten in, add the vanilla extract and turn the mixer to high and whip the icing for another minute to soften it up again.
Turn the mixer back to a slow speed and pour in the rest of the icing sugar.
Slowly beat it in and then return the mixer to a high speed before beating it for five minutes to give an incredibly pale, soft icing. If the icing seems a little stiff, you can always add a tablespoon of milk.
Remove a third of the icing and set it aside for decoration later.
To assemble the cake:
Take the darkest layer of cake, level it and stick it to the cake board with a small amount of icing.
Use a pastry brush (or a teaspoon if you don’t have one) and brush the top of the cake with syrup.
Spread a thin layer of the icing over the cake and repeat with the next darkest layer.
Continue adding layers to the cake until you have the white layer left for the top.
When you place the final layer, place it upside down so that its base becomes the top of the cake providing a flat surface to work on later.
Use the remaining icing that was not set aside to cover the entire cake in a layer of frosting. If you have time, use a small portion to make a crumb coat but otherwise, you can get a smooth, clean layer of icing by being careful.

Take the fondant and remove two balls about an inch across.
Flatten these out and mould them into ear shapes about an inch across and an inch and a half high. Insert the cocktail sticks into the base of each ear.
Roll the remaining fondant out into a long snake making one end thicker than the other.
Starting with the thin end, coil the fondant around the wooden dowel making sure to cover the tip. Leave a good two inches at the base of the dowel for it to stick into the cake to support the horn. Place the horn and the ears onto a tray and set aside to dry for half an hour.
Divide the remaining icing into thirds and colour each of them to your desired colour. I like having a dark version and a light version of the same colour along with a different colour for contrast.
Load the icing into piping bags fitted with star nozzles and pipe rosettes and kisses all over the top of the cake. Decide where you wish the front of the cake to be and pipe a rosette over the edge at the centre of the face.
Use the black food dye and a brush to paint eyes onto the face of the unicorn. I like them to be about two thirds of the way up the cake. It looks very good just to paint on winged eyeliner for the eyes as it shows where they are without being super fiddly to do which can mess up the cake (you only get one chance to do these).
Use the remaining icing to pipe a mane of rosettes and kisses down the side of the cake as if they are hair which is overflowing off the top.
To finish the horn and ears, place a small spoon of the lustre dust into a bowl and add a tiny amount of either vodka or rosewater. Mix this together to make a thick gold paint. It should have the consistency of single cream.
Brush the centre of each ear and the entirety of the horn with this gold paint.
Using a pair of scissors to support the base of the horn (these help with grip as well as preventing the horn sliding down the dowel), place it slightly to the front of the centre of the cake.
Stick the ears into the cake just next to the base of the horn.
Repaint any sections which may have been smudged during transition and voila, you have just finished your ombre unicorn cake!


This cake is a real showstopper and is sure to draw in lots of attention. As the icing prevents you seeing any of the layers inside, no one will expect the colourful interior and you are guaranteed to be remembered by anyone who has the privilege of eating this.
If you love cake, be sure to check out my chocolate and orange drip cake or, one of my personal favourites to both bake and eat, my coffee and walnut cake. If you are looking for something a little bit more on the savoury side, why not treat yourself to some delicious soup? My coconut and sweet potato soup tastes great and is also incredibly vibrant – it’s sure to bring a smile to your face.
Have a good one and I will be back next week with a recipe for a fantastic curry with homemade curry paste. It is so much easier than you think.
H

Hi thanks for sharing such an awesome tasty recipe on your such a great food blog. I hope you will like Carrot Cinnamon Cake which is a healthy dessert. Recipe link is https://borntoguide.com/2018/10/01/delicious-dessert-carrot-cinnamon-cake-recipe/ Plz like. Thanks.
LikeLiked by 1 person